Getting started with Falcon
This guide will introduce you to some of the basic functions of Falcon and Falcon terminology.
If you do not yet already have a Falcon account, head over to the Sign Up page to create an account and order your first Falcon units.
The Falcon tracking system provides a range of services from basic GPS tracking (showing a point on a map) to detailed analysis of vehicle data such as acceleration, fuel usage and idle time (gathered from a vehicle's CAN bus interface). Utilising all the data available through Falcon has been proven to help reduce fuel usage, cut costs and improve driver performance.
On this page
- Locating vehicles on a map
- Viewing a vehicle trail
- Viewing CAN bus data
- Geofences
- Further Reading
- Terminology
Locating vehicles on a map
When you first log in to Falcon you will be presented with the Dashboard. This collection of cards gives an overview of your fleet's performance, location and recent events.
View more information on the Dashboard Tutorial
- To view your all your vehicles, click 'Latest Positions' on the main menu along the top of the page.
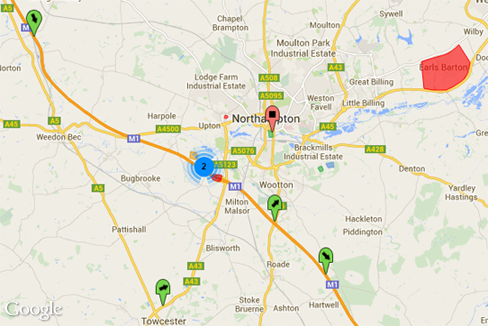
The Latest Positions page will display all your vehicles as pins on a map, as well as a simple list down the left hand side. The page will, by default, refresh every 2 minutes to keep the locations up to date. You can customise this refresh rate using the drop-down menu at the top right - you may also want to visit the 'Options' menu to customise the information displayed or filter specific vehicles.
View more information on the Latest Positions Tutorial
Viewing a vehicle trail
A heavily used part of Falcon is viewing where a vehicle has been, the route it has taken on a particular day. The Trails in Falcon are particularly powerful, allowing you to see all the geofences the vehicle has passed through, the speed the vehicle was travelling at each point along the route and even the amount of fuel the vehicle had at any moment.
To start, enter your vehicle registration in to the search box in the far top right hand corner of the Falcon website and click Search.
The Vehicle overview screen will display various details about your vehicle and device. For now we want to go directly to the Trail, locate the Trail icon on the right hand side and click it.
Initially no trail will load, you must select a time period and load the data. On the left hand side is the selection box:
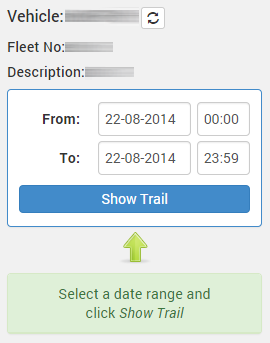
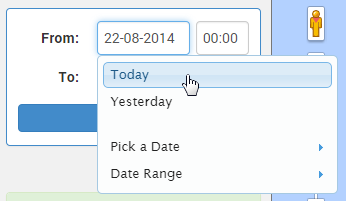
The default values will be set to today's date, alternatively you can click on the date field to show other defaults or set a range:
Click 'Show Trail' when happy with the date range to load the trail.
View more information on the Trail Tutorial
Viewing CAN bus data
CAN bus data is collected by Falcon Gold units. Using this data various metrics are collected:
- Fuel usage
- Idle time
- Throttle usage
- Engine revolutions
- Acceleration
- Braking
- Speed
- Power Take Off (PTO) usage
- Engine on time
- Cruise Control usage
Using all these metrics, Falcon generates a score for a vehicle or driver. This score can then be used as a comparison between vehicles and drivers to find the best or worst performers - and find out what differences lead to the better performance.
- To view this data click on 'Analytics' on the main menu.
The Analytics Dashboard will be displayed. This shows a number of cards with each metric represented.
- Click on 'Grading' in the left hand Analytics menu.
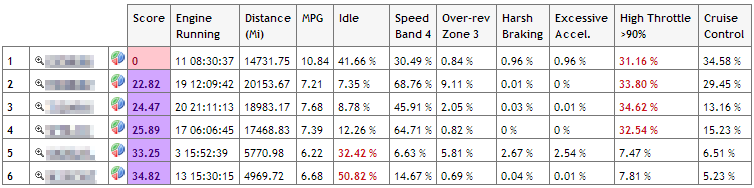
The screenshot above shows an example of lowest performing vehicles (where a score of zero is the lowest possible). The figures highlighted in red are the lowest metric for each vehicle.
View more information on the Analytics Tutorial
Geofences
A geofence is a virtual perimeter around a real location. In Falcon these are most useful for defining collection and delivery points. Once a geofence is defined, Falcon will automatically create a log when a vehicle enters and leaves that geofence. These records can then be reported on.
One use-case for a geofence may be a delivery point where a vehicle should stay for no longer than 1 hour. Falcon allows you to set a "wait time" on a geofence, and when that passes the vehicle is highlighted for attention.
To create your first geofence fence, click on 'Settings' on the main menu. On the Geofences screen, click 'New Geofence'.
View more information on the Geofences Tutorial
Further Reading
This guide has taken you through the very basics of Falcon and introduced you to Latest Positions, Analytics and Geofences. For a more detailed look at Falcon consider reading the following:
- Dashboard Tutorial
- Latest Positions Tutorial
- Trail Tutorial
- Analytics Tutorial
- Geofences Tutorial
- All Falcon tutorials
Terminology
- GPS - Global Positioning System. This is what Falcon uses to locate a vehicle, the same technology is used in Satellite Navigation systems and mobile phones.
- Geofence - A geofence is a virtual perimeter around a real location (see above).
- Device - When we talk about a device in Falcon we are referring to the physical box that has been installed in a vehicle to enable the GPS tracking and optionally the CAN bus data.
- CAN bus - The CAN bus is a technology that allows different electronic devices in a vehicle to communicate with each other, and share information with external devices like the Falcon device.
- Bronze, Silver and Gold Plans - Falcon has 3 different payment plans, each with more functionality. The basic Bronze plan includes GPS functionality, whereas the Gold plan includes full CAN bus data and analytics - view the Falcon Plans page.
- Idle - When idle is mentioned in Falcon it is referring to the time when a vehicle has it's engine switched on, but is not moving.
- Trail - A vehicle trail consists of a historic view of a vehicles location plotted on to a map to create a "trail" of where that vehicle has been.