Worker Calendar
On this page
- Introduction
- Calendar Overview
- Working Time Summary
- Calendar Tabs
- Adding Leave
- Video Tutorials
Introduction
The Worker Calendar may be seen as the central location for Tachomaster data. From the Worker Calendar it's possible to view driver activity, tachograph and WTD infringements, speeding and other warnings, leave information and more.
The Worker Calendar can be accessed from the main menu in Calendar -> Worker Calendar. The first screen you see when going to the Worker Calendar is the worker selection screen, select a worker to continue to the calendar.
Calendar Overview
The Worker Calendar holds a lot of information and is broken down into seperate areas to make finding what you need easy. We will look in to each of the areas further down. The 3 calendar tabs of Tacho, WTD and Rest all share the same calendar layout. Note that the calendar also shows the previous and next month where they overlap the weeks in the month you have selected - the data in these cells will be shaded grey.
All 3 tabs display days where a Worker is marked as "on leave". "Annual Leave", "Sick" and "Rest Day" are examples of Leave Types available in Tachomaster."

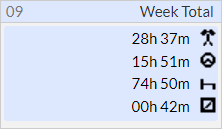
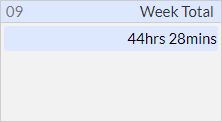
On both the Tacho and WTD tabs an extra column provides weekly totals, along with the week number.
Agency and Casual
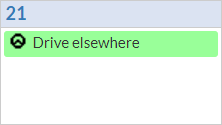
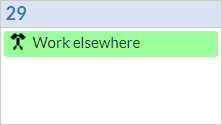
Agency and Casual workers may be marked as not working for you on selected days. This means you will not see a breakdown of activity or any infringements that may have occured on those days.
The Worker Calendar _does_ display information on a day where there was Drive or Work to help you better understand what work that driver has undertaken. An example of a day not worked for you, but with drive or work, looks like this:
Working Time Summary
The first item on the Worker Calendar is the Working Time Summary box. This gives you a quick overview of the current Working Time Directive reference period.
| Title | Description |
|---|---|
| Reference Period | Current reference period length. With the number of weeks into it |
| Start | If the reference period is fixed this is the start date |
| Dates Included | The entire date range of all completed weeks covered since the beginning of the reference period |
| Total time available this week | Hours available according to Working Time Directive rules |
| Total time worked | Total time worked within the reference period |
| Average time/week | Average number of hours worked per week during the reference period. This should not be more than 48 |
| Time available next week | Hours available next week taking into account hours worked so far in the reference period and current week |

The Tacho Tab
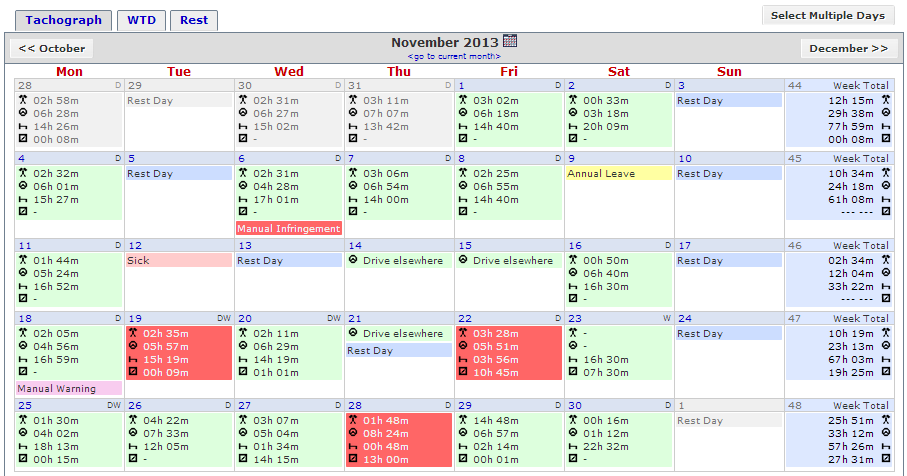
The Tacho tab main focus is on tachograph data (driver, work, availability and rest). Where a day has activity, each cell contains times for Work (![]() ), Drive (
), Drive (![]() ), Rest (
), Rest (![]() ) and Availability (
) and Availability (![]() ).
).
A single day may also have other data attached to it. In the image below the red day indicates an infringement, more details of an infringement can be seen by clicking on a day. A pink day, or a pink bar on a day, indicates there is a Warning on that day. A Warning may be a harsh braking or speeding event or a Warning that has been added manually.


Also notable on a single day are the letters in the top right hand corner. These indicate where the data for that day came from: D = Digital Tachograph, W = WTD, A = Analogue Chart, V = Vehicle Unit.
The WTD Tab
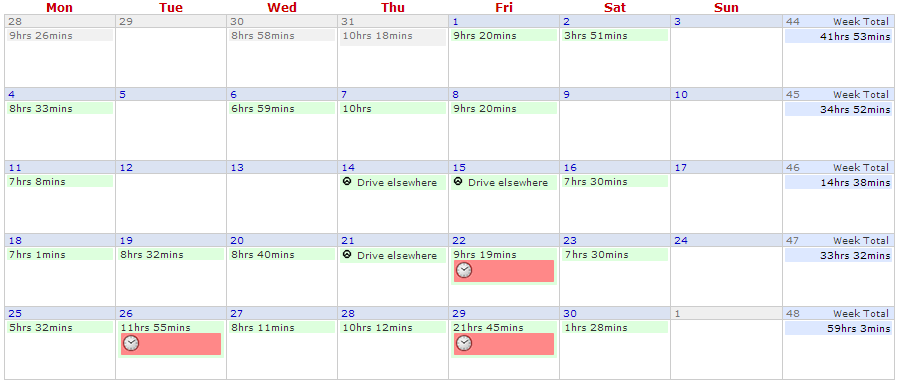
The WTD tab shows a simpler view than the Tacho tab. Work and Drive are both seen the same in the WTD rules so just one row will appear in a day that has work on it - displaying the total work time. This work time is then totalled in the Week Total column.
WTD Infringements are indicated by icons, the day below has a Work Period Exceeded infringement:

The Rest Tab
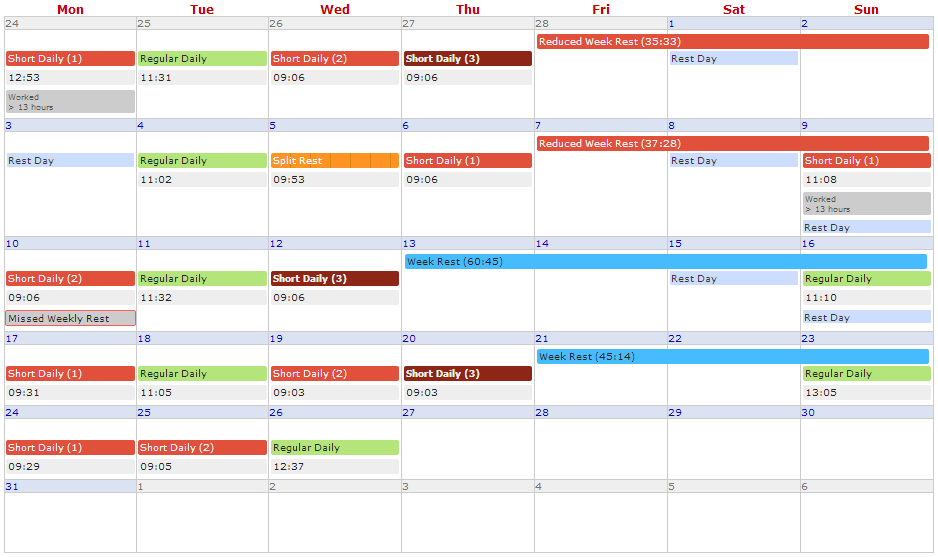
The Rest tab displays daily and weekly rest information. Noticably, it shows where a driver has had a reduced weekly rest or a short daily rest - giving you a better idea of how best to utilise the driver.
A reduced weekly rest is displayed as a red bar that will span across multiple days. Hovering the mouse over this reduced period will highlight where the compensation was taken (if taken at all):
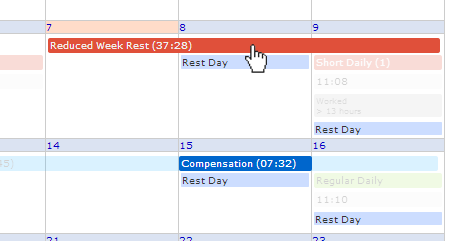
Beneath the calendar details of the compensation are shown:

Adding Leave
It is common to require days to be filled, no matter whether they are worked or not. An empty day is commonly known as a Missing Day. Leave Types are used to fill these empty days and can be added directly from the Worker Calendar.
Right Clicking
The quickest way to add the most common types of leave is to right-click on any day and select the type from the menu that appears:
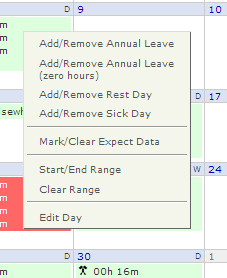
The following is available from this menu:
- Add/Remove Annual Leave
- Adds Annual Leave - counting as 8 hours towards the WTD where appropriate
- Add/Remove Annual Leave (zero hours)
- Adds Annual Leave - does not count towards WTD hours
- Add/Remove Rest Day
- Fills a day in so as not to be a Missing Day
- Add/Remove Sick Day
- Adds 1 day Sick - counting as 8 hours towards the WTD where appropriate
- Mark/Clear Expect Data
- For Agency and Casual workers it can be useful to mark a day where you are expecting data. This pro-actively marks the day as working for you. This can also be used to convert a day worked elsewhere to a day worked for you
- Start/End Range
- Select this option on one day, and right-click another day and click the same option - this will highlight both days and all inbetween. You can then right click any highlighted day and add leave at once
- Clear Range
- Clears the highlighted range
- Edit Day
- Navigate to the Edit Day screen for adding manual times.
Select Multiple Days
Above and to the right of the Calendar is a Select Multiple Days button. Clicking this enables a mode to select any number of days to add leave to. Once in the multiple days mode you can just left-click any days to highlight them. When the desired days are highlighted select the Leave Type and click DONE:

Options Menu
If you need to add a large range of leave to a single worker it is easiest to use the Add/Amend Leave Leave Dates facility on the Options menu - in the top right hand corner.

The Options menu has other uses too:
- Edit Worker
- Navigate to the Edit Worker screen
- Change Worker
- Go back to the worker selection screen
- Display Worker Summary
- Navigate to the Worker Summary
- Show Summary
- Toggle the Working Time Summary above the calendar
- Show Charts
- When an analogue chart is scanned it is given the default location of being with the driver (as a driver has to keep these for a fixed period). Ticking this option will display the chart location on the calendar and allow you to update it quickly.
